This article is about to connect Rockspace extender with the Firestick. Once you connect the Rockspace extender to the main router. All you need is the regular WiFi password, or if you setup a custom password for the extended WiFi, you can use that too.
Steps to Connect Rockspace extender with the Amazon Firestick-
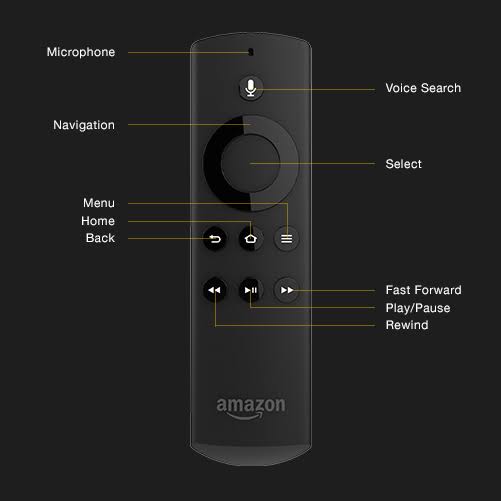
In the Firestick menu, you need to navigate to the “Settings” option. To see how you can use the remote to navigate, have a look at the option shown in the picture.
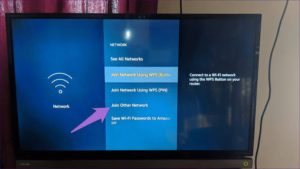
Under the settings menu, you’ll see 3 ways to connect the Firestick to the WiFi. You can choose any one of them. The options are shown in the picture.
- See All Network
- Then Join Network using WPS (button)
- Join Network using WPS (PIN)
- Join Other Network
See All Network-
- In this option, you’ll see all the WiFi networks available at your location.
- Choose your home WiFi and hit the connect option.
- It will require your WiFi password. Once you connected to the home WiFi or Rockspace extender setup WiFi, you can start using your Firestick online.
Join Network using WPS (button)–
- To use this option on your Amazon Firestick menu, you need to press the physical button on the Rockspace Extender.
- On the Rockspace AC1200 Extender, and Rockspace AC750 Extender you’ll find the WPS button on the front side marked as “WPS”.
- In this method, you don’t need to put any WiFi password manually. The Firestick collects the required information to connect with the Rockspace extender automatically.
Join Network using WPS (PIN)
- To Connect with WPS (PIN) Method you need the WPS PIN mentioned on the Rockspace extender.
- Enter the PIN and press the WPS on the Rockspace Extender.
- Wait for 2 minutes for a successful connection.
- You’ll see a success message on your TV screen.